
Table of Contents
This article will teach you how to start YS-6400, portable printed garment label cutting machine. While Please make sure the target label is printed, not woven. We have to use YS-4300 cutting machine for woven label cut.
1. Target Label Materials
YS-6400 is suitable for printed washing care label cutting. Label tag material can be taffeta, satin or PVC tape.
2. Preparation before starting
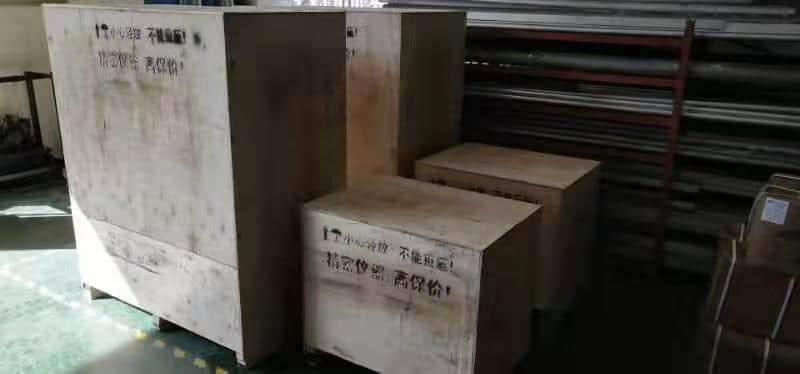
2. 1 Unpack Machine
To protect the machine, we use plywood box during shipment. When you get machine, please unpack it carefully and find accessories box. You will find operation manual, related tools like screwdrivers, wrenches and some spare parts in the box.
2.2 Read Manual and watch operation videos
there will be a flash disc with machine operation videos.
“PLEASE READ MANUAL AND WATCH VIDEOS BEFORE START THE MACHINE”.
2.3 Machine placement
We shall put label-cutting machine over a stable and flat table. Table height is according operator’s convenient. Adjust machine feet to level machine. It will reduce vibration during working. We’d better put a layer of rubber plate over the table.
2.4 Power
Machine is with single-phase AC electric power input.
Voltage: 220V AC
Frequency: 50 or 60Hz
Main motor power: 1.4Kw
3. Machine structure introduction
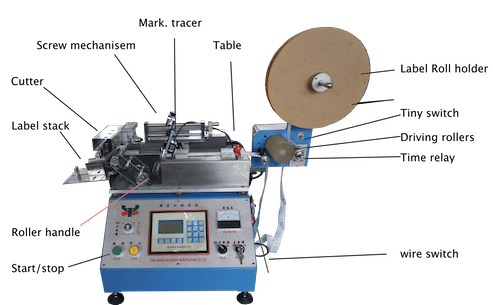
We’d better familiar with machine each parts at beginning. It will help use remember operation and get idea of trouble shoot when we meet.
3.1 Un-coiler
Or called label roll holder, it is with two acrylic discs to fix label roll and avoid collapse. Adjust press of two discs will also give proper friction during uncoil the care label roll.
3. 2 Feeding rollers
label feeding rollers is motorized. Because during the printed care label strip winding, roll diameter change may make different tension on the label strip roll. Unwind the care label ribbon will make feeding stable.
3.3. Label feeding table
There are some magnets over the table. They are assist guider for care labels. Over the table, there is a screw mechanism. It is for label mark tracer positioning.
3.4 Mark tracer
Printed care labels’ section length can have some errors While our cutting shall be exactly on the cut line. Mark tracer will track the “MARK” and guide cutter to cut properly.
3.5 Cutting head
Cutter include up and down blades. Cutting frame up /down movement will finish label cutting like scissors. Chino machinery standard YS-6400 machine is with cold blade cutter. Top blade has one cutting edge and down blade has two.
We can make optional hot cutter label cutter, but in fact, it is not so common for customers.
Just beside the top cutter, there is a lionization bar. Which will eliminate static electricity on the label. So that the labels will not stick each other during stacking.
3.6. CNC controller
the programmable controller had been developed for many years. Optimized system will make machine working stable and easier to operate.
3.7 Output Stacking
YS-6400 has very simple stacking structure. Operator can make small carton box to collect finished labels.
4. Controller introduction
Screen parameter introduction
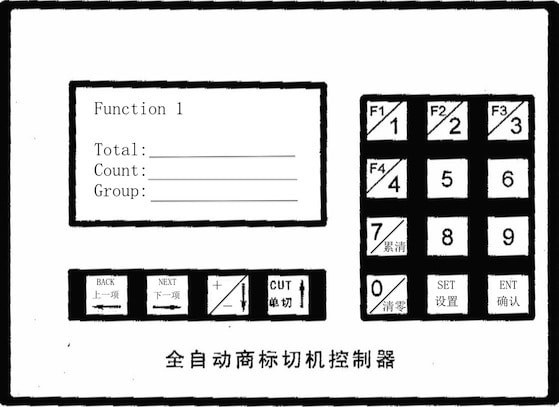
“Count”: show current finished cut numbers, push “7” to clear;
“Group”: show total finished cut, push “0” to clear
“Length”: measure actual length; unit in “mm”;
“Drivers speed ”: label feeding speed, 1~6 speed up;
“Reamers speed”: cutting speed, 1~6 speed up;
“Error Range” : adjust cutting position forward or backward. If the cutting position is before required line, we can set “-” value. On the other side, we can set “+ ” value to set cutting properly. (-3~+3mm)
5. Operation steps
You can follow us on youtube channel,
Chino Machinery Garment label machines
5.1 Load care label roll on unwind holder
we can put care label roll on one disc and then put them together on unwind holder.
5.2 Make label through driving pinch rollers
There is a tiny around the rollers. Turn it on and open movable roller to make label in. The timer is for driving time per cycle. When the label strip is too short to touch steel wire, driving motor will be triggered. Motor will run some seconds and stop. There will be enough label redundancy for next cycle.
Please note that printed care labels can have static electricity. It will label strip stick each other. To avoid stuck into rollers, we can put a small paper carton ring over label strip. It will give some tension to printed label.
5.3 Put label strip through table
The weight block over label will give some friction during moving. It will make label flat in feeding procedure. Adjust the magnets to give proper guide for label.
5.4 Feed label into cutter
Feeding rollers are just in front of cutter. Between cutter and rollers, there is stainless plate to press label. We shall turn black handle to open rollers to move label in. then turn the handle oppositely to hold the label.
On control panel, press BACK button to move label cut line under cutter.
5.5 Mark tracer teach-in
- Turn screw mechanism handle to make mark tracer lop spot on one MARK.
- Press side tracer set button one time.
- Move light spot at blank area, and Press set button again. Mark tracer is ready.
NOTE: We can set any printed content as MARK. The MARK shall be clear. Before the mark, there shall be enough blank area. Select MARK close to cutter is better.
5.6 Set label length on controller
- Measure the printed care label sections. Label length can be some different. If not big different, we can select the longer one as label length.
- Go to controller,
- Select F1 function
- Set Length = measured length +0.5mm.
- When mark tracer finds the MARK, machine will start cutting.
- Press START button to run machine.
5.7 Label stacking
Operator can put small carton box to collect finished labels. This box can be just a little bigger than label size, the finished label will stack properly.
6. Notes
Please check operation manual to select proper cutting function. F1 is for normal cutting.
- F1: Automatic cut mark tracing, no blank remove
- F2: TEST mode for F1 (single piece cut)
- F3: Fixed length cut, no cut mark tracing
- F4: Automatic cut mark tracing and blank remove